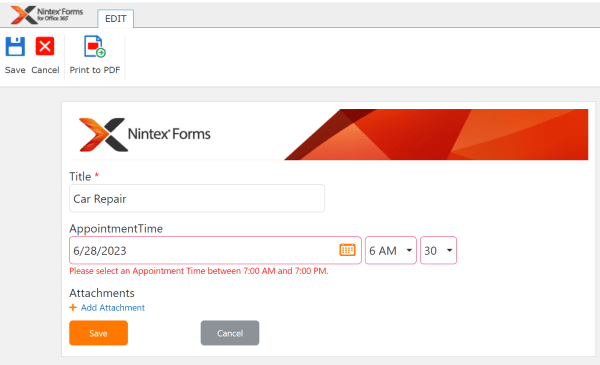
Validate a Single Email Address Field in a Nintex Form
I recently built a Nintex Form that included a field where the user was asked to fill in their email address. The form needed to verify that the user was entering a valid email address.
This can be accomplished using a Regular Expression in the settings of the form control. Below are the steps and Regular Expressions I used for validation the email address entered.
- Add a Single Line Textbox control to the form.
- Open the Control Settings and expand the Validation section.
- Change the “Use a regular expression” choice to Yes.
- Enter the one of the regular expressions below in the “Regular expression” field.
- Enter your custom validation message in the “Regular expression error message” field (for example, “Please enter a valid email address”).
- Save and publish the form.
Below is the main regular expression I have used to validate an email address on a form.
(?:[A-Za-z0-9!#$%&’*+/=?^_`{|}~-]+(?:\.[A-Za-z0-9!#$%&’*+/=?^_`{|}~-]+)*|”(?:[\x01-\x08\x0b\x0c\x0e-\x1f\x21\x23-\x5b\x5d-\x7f]|\\[\x01-\x09\x0b\x0c\x0e-\x7f])*”)@(?:(?:[A-Za-z0-9](?:[A-Za-z0-9-]*[A-Za-z0-9])?\.)+[A-Za-z0-9](?:[A-Za-z0-9-]*[A-Za-z0-9])?|\[(?:(?:25[0-5]|2[0-4][0-9]|[01]?[0-9][0-9]?)\.){3}(?:25[0-5]|2[0-4][0-9]|[01]?[0-9][0-9]?|[A-Za-z0-9-]*[A-Za-z0-9]:(?:[\x01-\x08\x0b\x0c\x0e-\x1f\x21-\x5a\x53-\x7f]|\\[\x01-\x09\x0b\x0c\x0e-\x7f])+)\])
I have also used the regular expression below to validate an email address. It’s much simpler but does not check as extensively for certain patterns. It does check for a 2-4 domain extension after the period.
^([\w+-.%]+@[\w-.]+\.[A-Za-z]{2,4};?)+$

Kudos to Eric Harris for first sharing this in his post on the Nintex Xchange site: Simple email validation for forms
Speaking at SharePoint Saturday Charlotte 2017
I am speaking at SharePoint Saturday Charlotte 2017 on August 26, 2017. This year I will be speaking on “Empower Your Mobile Workforce with Nintex Mobile and Nintex App Studio”. Find out more and register for this free SharePoint conference at the SharePoint Saturday Charlotte site.
Be sure to attend my session and say hello at the conference!
Empower Your Mobile Workforce with Nintex Mobile and Nintex App Studio
Employees today are increasingly on the move and expect to have access to the tools they need to get their work done. Nowhere is this more crucial than on the devices they carry and the mobile apps they use. Nintex provides the tools necessary to enable your mobile workforce to be more efficient and productive. This session will cover features of Nintex Mobile and Nintex App Studio that you can utilize to build dynamic mobile forms and apps with little or no code. You will learn how to leverage Nintex Mobile and Nintex App Studio to create powerful, easy-to-customize mobile forms and apps to empower your organization.
Speaking at the Atlanta Nintex User Group Meeting on 7/26/17
I’m excited to be speaking at the next Atlanta Nintex User Group on July 26, 2017. I will be presenting a session titled “Empower Your Mobile Workforce with Nintex Mobile and Nintex App Studio”. I hope to see you there! For more information and to sign up, visit the Atlanta Nintex User Group page on Meetup at https://www.meetup.com/Nintex-User-Group-Atlanta.
Here’s a summary of my session:
Empower Your Mobile Workforce with Nintex Mobile and Nintex App Studio
Employees today are increasingly on the move and expect to have access to the tools they need to get their work done. Nowhere is this more crucial than on the devices they carry and the mobile apps they use. Nintex provides the tools necessary to enable your mobile workforce to be more efficient and productive. This session will cover features of Nintex Mobile and Nintex App Studio that you can utilize to build dynamic mobile forms and apps with little or no code. You will learn how to leverage Nintex Mobile and Nintex App Studio to create powerful, easy-to-customize mobile forms and apps to empower your organization.
Speaking at SharePoint Saturday Atlanta 2017
I am speaking at SharePoint Saturday Atlanta 2017 on June 17, 2017. This year I will be speaking on “Empower Your Mobile Workforce with Nintex Mobile and Nintex App Studio”. Find out more and register for this free SharePoint conference at the SharePoint Saturday Atlanta site.
Be sure to attend my session and say hello at the conference!
Empower Your Mobile Workforce with Nintex Mobile and Nintex App Studio
Employees today are increasingly on the move and expect to have access to the tools they need to get their work done. Nowhere is this more crucial than on the devices they carry and the mobile apps they use. Nintex provides the tools necessary to enable your mobile workforce to be more efficient and productive. This session will cover features of Nintex Mobile and Nintex App Studio that you can utilize to build dynamic mobile forms and apps with little or no code. You will learn how to leverage Nintex Mobile and Nintex App Studio to create powerful, easy-to-customize mobile forms and apps to empower your organization.
Using the Lookup Function in Nintex Forms
Nintex Forms offers many great features for designing and customizing your SharePoint forms. There are times when you need to pull in data to your forms from other sources, including other SharePoint lists. One way to accomplish this is to use the Lookup function, which allows you to retrieve data from a column within a SharePoint list and display that data on a form or use it in a formula. The Lookup function can be utilized within a Calculated Value control, Form Variable, or Rule.
Here’s the syntax for configuring the Lookup function:
lookup(List Title, Column to filter on, Value to filter on, Output column)
- List Title – The title of the list that contains the data you are retrieving. The list can be in the current site or another site. To configure with a list on another site, start by prepending the List Title with the server relative URL path of the site and then delimit the list title with a pipe (|) symbol. For example, “/sites/siteCollection/siteName|ListTitle”.
- Column to filter on – The name of the column in the list that you want to filter on. This column is used to filter which list items are returned as matches occur against the third parameter.
- Value to filter on – The specified value that is compared against each item in the list. Be sure to use a Named Control instead of an item in the Item Properties tab for this value.
- Output column – The column name in the list from which the data is retrieved.
Lookup Function Configuration Example
For our example, we created an Order form using Nintex Forms that is used to create a customer order. When a user enters a value into the Product Number field, the Orders form pulls back data from the Product Information list using the Lookup function. The following two lists were created and configured for this example:
- Orders – This list houses the order form and stores the order information upon submission. List columns include Order Number, Product ID, Product Name, Production Description, and Product Cost.
- Product Information – This list is used to provide information about the products offered. List columns include Product ID, Product Name, Product Description, and Product Cost.
Now that we have the required lists and columns in place, here are the steps used to configure the Product Information lookups in the Orders form.
- Open the Orders form in the Nintex Forms designer.
- Add a Calculated Value column to the form to display the Product Name and configure the Control Settings with the following values:
- Formula = lookup(“Product Information”, “Product ID”, ProductID, “Product Name”) where ProductID is the Name of the form control.
- Name = ProductName
- Connected to = Product Name
- Save as data type = String
- Recalculate formula on view mode = Yes
- Add a Calculated Value column to the form to display the Product Description and configure the Control Settings with the following values:
- Formula = lookup(“Product Information”, “Product ID”, ProductID, “Product Description”) where ProductID is the Name of the form control.
- Name = ProductDescription
- Connected to = Product Description
- Save as data type = String
- Recalculate formula on view mode = Yes
- Add a Calculated Value column to the form to display the Product Cost and configure the Control Settings with the following values:
- Formula = lookup(“Product Information”, “Product ID”, ProductID, “Product Cost”) where ProductID is the Name of the form control.
- Name = ProductCost
- Connected to = Product Cost
- Save as data type = Currency
- Use thousand separator = Yes
- Value prefix = $
- Recalculate formula on view mode = Yes
- Publish the form and open it in the Orders list.
- Enter a valid value into the Product ID field on the form and go to another field. The form will automatically pull and display the data from the Product Information list into the Product Name, Product Description, and Product Cost fields.
Speaking at SharePoint Saturday Charlotte 2016
I am speaking at SharePoint Saturday Charlotte 2016 on September 17, 2016. This year I will be speaking on “Create High Impact Forms with Nintex Forms”. Find out more and register for this free SharePoint conference at the SharePoint Saturday Charlotte site.
Be sure to attend my session and say hello at the conference!
Create High Impact Forms with Nintex Forms Workflow
Want to build sophisticated forms that solve business scenarios? Learn how to leverage Nintex Forms to create powerful, easy-to-customize forms for your organization. This interactive session explores design techniques and advanced features utilized to enhance your browser and mobile forms. You can build dynamic forms with corporate branding, rules, validation, mobile layouts, and more with little or no code. We will showcase real world examples and construct a live form application that attendees can interact with on their mobile device.
Speaking at SharePoint Satuday Atlanta 2016
I am speaking at SharePoint Saturday Atlanta 2016 on June 11, 2016. This year I will be speaking on “Create High Impact Forms with Nintex Forms”. Find out more and register for this free SharePoint conference at the SharePoint Saturday Atlanta site.
Be sure to attend my session and say hello at the conference!
Create High Impact Forms with Nintex Forms Workflow
Want to build sophisticated forms that solve business scenarios? Learn how to leverage Nintex Forms to create powerful, easy-to-customize forms for your organization. This interactive session explores design techniques and advanced features utilized to enhance your browser and mobile forms. You can build dynamic forms with corporate branding, rules, validation, mobile layouts, and more with little or no code. We will showcase real world examples and construct a live form application that attendees can interact with on their mobile device.
“Transitioning from InfoPath to Nintex” Whitepaper Published
I can now add “Whitepaper Author” to my resume. Nintex recently published the “Transitioning from InfoPath to Nintex” whitepaper that I authored with their team.
If you’re currently using InfoPath and are considering a move to Nintex Forms, this whitepaper will be a great resource for you. You’ll find information about Nintex Forms features and functionality, transitioning best practices, which forms make sense to convert, a real-world forms migration scenario, and what other organizations have to say about their transitioning experiences.
Here’s a summary of the “Transitioning from InfoPath to Nintex” whitepaper:
“Microsoft has retired InfoPath but transitioning to a new forms solution doesn’t have to be daunting. And whether you use InfoPath or don’t use any forms solution, implementing Nintex Forms can result in increased productivity and other benefits for your organization.
We built Nintex Forms to be easy to use, customizable, mobile-friendly, dynamic and powerful. Customers like BGC Engineering rely on Nintex Forms to capture valuable information. “Having all of my forms available on my device has really helped accelerate the process of gathering information when I’m in the field,” says Annie Ruksys, Geological Engineer at BGC. “It makes my job easier knowing that I can just enter the data, and it is sent automatically once a connection is available.”
In our “Transitioning from InfoPath to Nintex” whitepaper, you’ll find answers to the following questions:
- What features and functionality make Nintex Forms unique – and help customers like BGC Engineering successfully complete projects faster?
- What are best practices for transitioning to Nintex Forms?
- How do you identify which forms make the most sense to convert to Nintex Forms?
- What’s a real-world forms migration scenario?
- What do employees at organizations that have transitioned from InfoPath to Nintex Forms say about their experiences?“
Download the “Transitioning from InfoPath to Nintex” whitepaper.
Completed Nintex Workflow Pro Certificate and Nintex Workflow Admin Certificate
I recently completed both the Nintex Workflow Pro Certificate and the Nintex Workflow Admin Certificate.
The Workflow Pro Certificate is for skilled Nintex platform users and covers designing, creating, and debugging Nintex workflows and forms.
The Nintex Workflow Admin Certificate is for skilled Nintex platform administrators and covers various abilities and knowledge including the installation and maintenance of the Nintex Platform.
Speaking at the Atlanta SharePoint User Group Meeting on Sept. 21
I’ll be speaking at the Atlanta SharePoint User Group meeting on Sept. 21 on “A New Era in SharePoint Workflow and Forms Development”.
SEPTEMBER 21 MEETING – SharePoint Adoption & SharePoint Forms using Nintex